For the Potatoes:
4 large Russet potatoes (similar in size for even baking)
1-2 tbsp olive oil or melted butter
Coarse sea salt or kosher salt
For the Topping:
1 cup sour cream (full-fat for the best flavor)
¼ cup fresh chives, finely chopped
2 tbsp unsalted butter, softened (optional, for extra richness)
Salt and freshly ground black pepper to taste
Step-by-Step Instructions
Step 1: Prep the Potatoes
Preheat oven to 400°F (200°C).
Scrub potatoes thoroughly under running water to remove any dirt. Dry completely with a kitchen towel.
Prick each potato 8-10 times with a fork to allow steam to escape during baking.
Step 2: Season and Bake to Perfection
Rub each potato lightly with olive oil or melted butter, then sprinkle generously with coarse salt.
Place directly on the oven rack or on a baking sheet. Baking directly on the rack allows for maximum air circulation and crispier skin.
Bake for 45-60 minutes, depending on size, until the skin is crisp and the inside is tender when pierced with a fork.
Step 3: The Fluffing Technique
Remove potatoes from oven and let them cool for 5 minutes—just enough to handle.
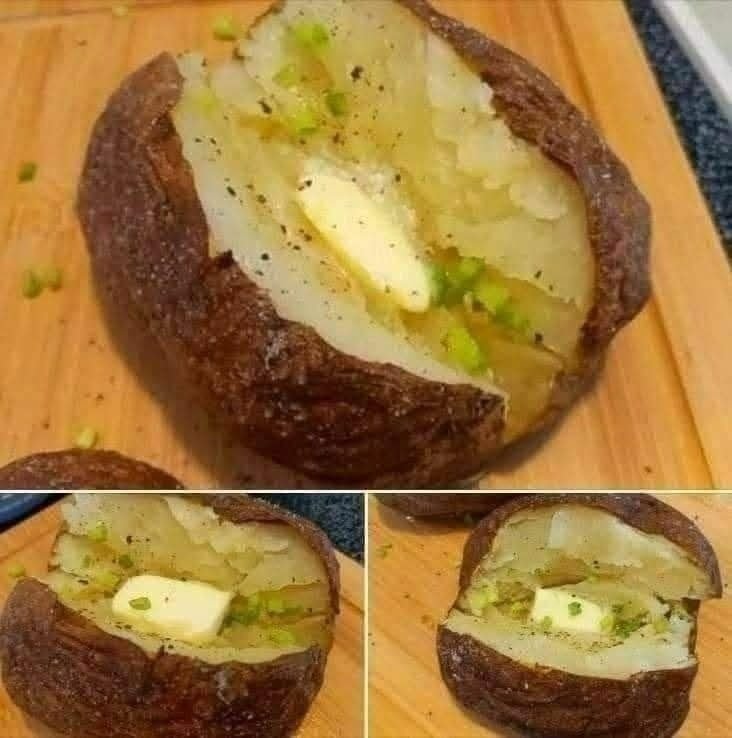
Make a lengthwise cut across the top of each potato, then gently push ends toward the center to open it up.
Fluff the inside with a fork to create the perfect texture for holding toppings.
Step 4: Add the Finishing Touches
Top each potato with a dollop of sour cream, a sprinkle of fresh chives, and a pat of butter if using.
Season with salt and pepper to taste.
Serve immediately while hot and glorious!
👩🍳 Pro Tips for the Perfect Baked Potato
Choose the Right Potato: Russet potatoes are ideal for baking—their high starch content creates that signature fluffy texture
Don’t Skip the Oil & Salt: This combination is what creates that irresistible crispy, flavorful skin
Test for Doneness: The potato should feel soft when gently squeezed (use an oven mitt!)
For Extra Crispy Skin: Rub with oil and salt, then bake directly on the oven rack
Make It a Meal: Add cooked bacon, shredded cheese, or steamed broccoli for a loaded version
🍽️ Serving Suggestions
Classic Comfort: Alongside grilled steak or roasted chicken
Vegetarian Delight: With a side of roasted vegetables or a crisp salad
Game Day Favorite: Set up a baked potato bar with various toppings
Elegant Dinner Party: Serve as a rustic yet refined side dish
Storage & Reheating
Refrigerate: Store leftover baked potatoes (without toppings) for up to 4 days
Reheat: Return to a 350°F (175°C) oven for 15-20 minutes to restore crispness
Freeze: Not recommended—the texture changes significantly when thawed
Why This Method Works
The high oven temperature and direct heat ensure the skin becomes wonderfully crisp while the inside steams to fluffy perfection. Rubbing the potatoes with oil helps conduct heat evenly and makes the skin deliciously edible, while the salt enhances flavor and draws out moisture for extra crispness.
Common Questions
Can I microwave the potatoes instead?
You can, but you won’t achieve the same crispy skin. For best results, use the oven!
How do I know when they’re done?
The skin should be crisp, and a fork should slide easily into the center.
What if I don’t have fresh chives?
Green onions, dried chives, or even a sprinkle of parsley work well too.
Can I prepare these ahead of time?
You can bake the potatoes ahead and reheat them, but they’re best served fresh from the oven.
Final Scoop
This Sour Cream & Chives Baked Potato recipe proves that sometimes the simplest dishes, when executed with care, can be the most memorable. It’s a testament to how a few quality ingredients can come together to create something truly extraordinary.
Now we’d love to hear from you!
What’s your favorite baked potato topping? Do you have any special tricks for getting the perfect baked potato? Share your tips and stories in the comments below! 👇